
If you have ever wondered does engineered need to sit in a room to acclimate before you begin an installation project, the short answer is yes. Every plank of wood-based flooring carries a certain internal balance of temperature and humidity from the factory or warehouse where it was stored, and that balance rarely matches the environment inside your home on the day the boxes arrive.
Skipping this critical waiting period is one of the most common reasons homeowners end up with buckling seams, visible gaps between boards, or hollow spots that click underfoot. Taking the time to let your engineered hardwood reach equilibrium with the space where it will be permanently installed protects your investment and ensures a smooth, long-lasting floor.
Does engineered wood flooring need to acclimate before installation?

Many homeowners assume that because engineered planks are built with a layered plywood or HDF core, they can skip the resting period entirely and acclimate only solid wood species. While engineered products are certainly more dimensionally stable than their solid counterparts, they still contain a real hardwood veneer on top and wood-based layers underneath that respond to environmental shifts.
Because of that layered construction, engineered hardwood still typically requires acclimation to perform at its best once locked or glued into place. Ignoring the manufacturer's guidance can void your warranty, leave you with costly repairs, and create stress on joints that were designed to sit flush under normal living conditions.
What defines high-quality engineered wood flooring?
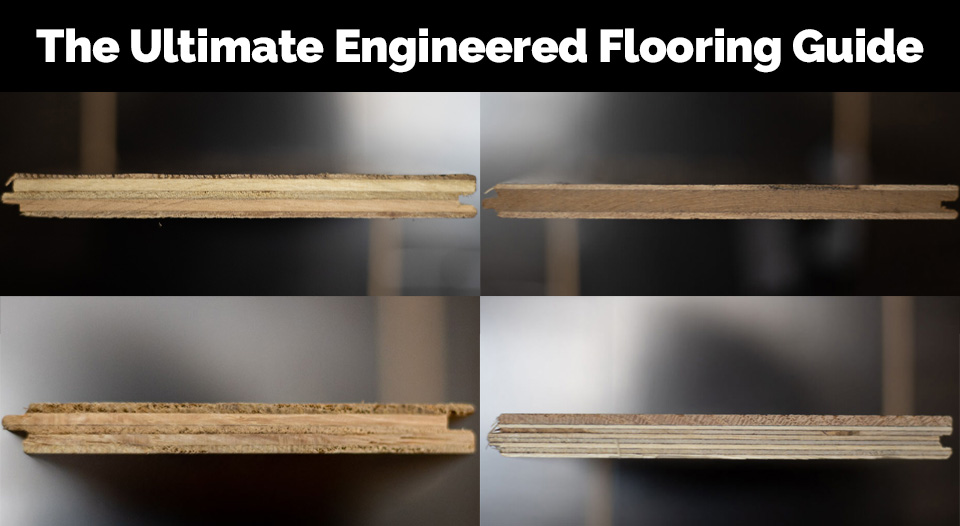
A premium engineered plank requires attention to several structural details that separate it from budget alternatives. The veneer layer on a quality product is usually between two and six millimeters thick, which allows for future sanding and refinishing. Beneath the veneer, the core layers are arranged in a cross-grain pattern that counteracts the natural tendency of wood to expand and contract along the grain direction.
Reputable brands also seal all four edges during manufacturing and apply protective coatings that help regulate how quickly each plank absorbs or releases ambient vapor. When the moisture level inside the plank already sits close to the environment of your living space, you reduce the chance of post-installation movement dramatically.
Why installers say you need to acclimate planks

Professional flooring contractors emphasize this step because they have seen firsthand what happens when the final install is rushed. Wood fibers that need to adjust to the new environment will continue to absorb or shed vapor after installation, creating internal pressure across hundreds of square feet of locked-together boards.
Proper hardwood acclimation eliminates most of that risk by allowing each plank to slowly reach the same temperature and relative humidity as its surroundings before it is permanently secured. Installers view the waiting period as cheap insurance against callbacks, warranty disputes, and unhappy customers.
The impact of indoor moisture levels
Indoor environments are far less stable than most people realize. Cooking, showering, seasonal HVAC cycling, and even the number of occupants in a home all influence the amount of wood moisture that planks will encounter once they are part of your floor system. A house in the humid Southeast will present a very different challenge than a dry mountain cabin at high elevation.
When there is a significant gap between the internal content of a plank and the surrounding room conditions, the flooring will try to equalize on its own after installation. That equalization shows up as cupping on individual boards, peak formation along seams, or gaps wide enough to catch debris and become permanent eyesores.
How patience prevents future damage
Rushing past the acclimation process is tempting when you have a tight renovation schedule or a crew standing by, but the consequences almost always cost more than the delay. Boards installed too early may appear fine for the first few weeks and then begin shifting as the seasons change and the HVAC system adjusts to heating or cooling modes.
Once warping or gapping has occurred, the only reliable fix is usually a partial or full tear-out, which means additional material expense and labor charges. Engineered hardwood flooring needs time to settle into its permanent environment so that the dimensional changes after installation are small enough for the joints and adhesive to absorb without visible distortion.
How long does engineered hardwood take to adjust?
Most manufacturers recommend a resting period of at least 48 to 72 hours, though some specify up to a full week depending on the product line and regional climate. Understanding the specific acclimation times for your chosen flooring brand is essential, and you can usually find those details printed on the packaging or listed in the installation guide that ships with every order.
The answer to how long does engineered hardwood actually take can vary based on the thickness of the plank, the species of the veneer, the type of core material, and how far the storage conditions at the retailer differed from your home. Thicker planks with denser cores generally take longer to reach equilibrium than thinner, lighter options.
Standard guidelines for flooring acclimation
Industry standards for flooring acclimation are set by organizations like the National Wood Flooring Association, and they provide a reliable starting framework for any residential project. Following these guidelines protects your warranty and gives the installer confidence that the material is ready.
- Open all boxes and remove any plastic wrapping so air can circulate around every plank surface
- Maintain indoor temperature between 60 and 80 degrees Fahrenheit with relative humidity between 30 and 50 percent
- Allow a minimum of 48 hours for standard products, extending to five or more days for wider or thicker hardwood
- Stack planks in a flat, staggered pattern with spacers to promote airflow on all sides
Keep in mind that the minimum timeframe listed on the box is exactly that, a starting point. If your readings show that the planks have not reached equilibrium after the suggested period, extend the wait until the numbers align before allowing any cutting or fastening to begin.
Special conditions change how you acclimate hardwood
Certain situations demand a longer or more carefully managed resting period. If you acclimate hardwood in a newly constructed home where drywall mud, paint, and concrete are still releasing moisture, the environment itself is unstable and can extend the timeline significantly. Similarly, below-grade installations over concrete slabs introduce ground-level vapor that the hardwood must contend with.
Seasonal extremes also play a role. Acclimating hardwood during winter in a northern climate where the furnace runs constantly means the indoor air may be unusually dry, while a summer project in a coastal region could expose hardwood to elevated humidity. Adjusting your HVAC settings and using a dehumidifier or humidifier to stabilize the space before and during the resting period ensures the hardwood will reach true equilibrium.
Steps to safely acclimate engineered wood flooring
When you acclimate engineered hardwood floors correctly, you set the stage for an installation that looks and performs beautifully for decades. The steps are straightforward, but each one matters, and cutting corners on any single phase can undermine the entire effort.
Before the material even arrives, make sure the space is ready to receive it. Engineered hardwood floors should acclimate in the actual rooms where they will be installed, not in a garage, storage unit, or unfinished basement where the temperature and humidity bear no resemblance to normal living conditions.
Preparing the subfloor and environment
The subfloor must be clean, dry, level, and structurally sound before you bring any flooring material into the room. Concrete slabs should be tested for vapor emissions, and any readings above the manufacturer's threshold will need a moisture barrier or mitigation system before you proceed.
- Sweep or vacuum all dust, debris, and leftover construction material from the subfloor surface
- Verify the subfloor is level within three-sixteenths of an inch over a ten-foot span using a straightedge
- Run the HVAC system for at least 48 hours before bringing planks into the space to stabilize indoor air
- Test concrete subfloors with a calcium chloride test or in-situ relative humidity probe to confirm acceptable readings
Once the environment is dialed in, bring the flooring boxes into the room and arrange them so air can move freely around each stack. Avoid placing boxes directly against exterior walls where temperature differentials are greatest, and keep them away from heating vents or direct sunlight that could create uneven drying.
Best practices for acclimating hardwood efficiently
Efficiency during this phase comes from preparation, not shortcuts. Open every box fully rather than just slitting the top, because trapped packaging material restricts airflow and creates pockets where vapor cannot escape or enter the plank surfaces evenly.
Record daily readings of both the planks and the subfloor at several locations across the room. When the difference between the two readings falls within the range specified by the manufacturer, usually two to four percent, the material is ready for installation and you can confidently schedule your crew.
Comparing solid wood versus engineered hardwood rules
Solid hardwood planks are milled from a single piece of timber and respond to environmental changes more aggressively than engineered alternatives. Because every fiber in a solid plank runs in the same direction, expansion and contraction are more pronounced, and the resting period is almost always longer, often seven days or more depending on species and plank width.
Engineered products benefit from their cross-laminated core, which restricts movement in multiple directions simultaneously. That structural advantage means the adjustment period is typically shorter and the margin for error is slightly more forgiving, but it does not eliminate the step entirely. Both product types demand attention to environmental control and verified readings before installation begins.
Tools required for checking room environments

A reliable moisture meter is the single most important instrument for any flooring project. Pin-type models insert small probes into the wood to measure electrical resistance, while pinless models use electromagnetic signals to scan beneath the surface without leaving marks. Either style works, though many professionals carry both to cross-check readings on different materials.
- A pin-type or pinless wood-specific meter for reading plank content at multiple points
- A thermo-hygrometer to track ambient temperature and relative humidity throughout the resting period
- A concrete-specific meter or calcium chloride test kit for slab subfloor evaluations
- A straightedge and feeler gauge for verifying subfloor flatness before laying any material
Investing in quality moisture meters pays for itself many times over by giving you objective data rather than guesswork. Checking readings at the center and edges of the room, near exterior walls, and close to any plumbing or HVAC equipment ensures you catch problem areas that could lead to localized failures after the floor is finished.
Final summary and project checklist
Every successful flooring installation begins long before the first plank is cut. By understanding why the resting period matters, controlling the indoor environment, and verifying readings with proper instruments, you protect yourself from the most common and costly installation failures. The relatively small investment of time and attention during this preparatory phase delivers outsized returns in floor performance and longevity.
Before your installation date, confirm that all boxes have been opened and resting in the target rooms for the manufacturer's recommended duration, that your subfloor passes every flatness and dryness test, and that the difference between plank readings and subfloor readings falls within the accepted range. With those boxes checked, you can move forward knowing your new floors are set up to look beautiful and perform flawlessly for years to come.