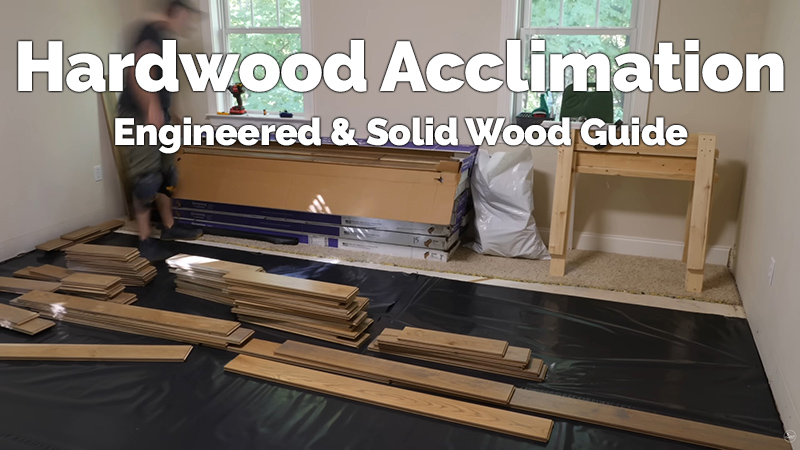
What is a Wood Floor Acclimation?
Before any wood flooring is installed in a home, it must spend time resting inside the living space so its internal moisture content can reach a balance with the surrounding air. The hardwood acclimation process is essentially laying out wood flooring boxes to sit unopened or loosely stacked within the room where they are to be installed in. This acclimation down-time gives all types of wood flooring products to respond to the temperature and atmospheric conditions unique to your home. Skipping this critical window is one of the most common reasons homeowners experience warping, buckling, and unsightly gaps after their wood flooring is installed.
Think of this preparation phase as an introduction between your new wood flooring purchase and your home. Every house carries its own internal moisture content climate that is shaped by heating systems, cooling units, cooking habits, and even the number of occupants. When raw wood arrives from a warehouse or distribution center, it carries the climate fingerprint of wherever it was stored last. Allowing a transition period bridges that gap, giving the wood material time to shed or absorb atmospheric vapor until it reaches a resting point that mirrors your interior conditions.
Why does hardwood need to adapt?

The role of moisture content
Every species of wood contains water trapped inside its cell walls and fibers. Wood moisture levels shift constantly depending on the vapor present in the surrounding atmosphere, which means a freshly delivered bundle could be holding far more or far less internal water than what your living room demands. If the material is installed while carrying excess water, it will shrink as it dries, pulling apart at the seams. Conversely, overly dry material will swell once it absorbs vapor from humid indoor air, pushing boards against one another and lifting them off the subfloor.
The reason this acclimation exchange happens so readily is that wood is hygroscopic, meaning it naturally pulls in and releases moisture from the air around it. This characteristic never disappears, even after milling, finishing, and sealing. While coatings slow the rate of exchange, they cannot stop it entirely. Understanding this fundamental behavior helps explain why patience during the preparation window is not optional but rather essential for a lasting result.
Understanding equilibrium moisture levels
Every indoor space holds a specific combination of temperature and relative humidity that is unique to their home. These differing levels change how much or how little the internal water inside a piece of lumber will absorb or shed when left inside your home undisturbed. The goal of hardwood flooring acclimation is to reach the equilibrium moisture content, or EMC. EMC is the point at which the material stops gaining or losing moisture content because it has reached a state of balance with its surroundings. Professionals rely on EMC charts published by forestry research organizations to predict the ideal internal percentage for a given set of room conditions.
Reaching this balanced moisture content target before the hardwood flooring is installed is the entire goal of the acclimation preparation window. When the internal reading of your delivered material matches the EMC dictated by your room conditions, the risk of post-installation movement drops dramatically. Ignoring this number and rushing the timeline almost guarantees dimensional changes that will show up as visual defects within the first heating or cooling season.
How long does it take to acclimate?

Most manufacturers specify a minimum resting window of at least three days for hardwood, though many installers extend that recommendation to a full week or longer depending on the species and the starting condition of the material. Thicker cuts, denser species, and bundles arriving from climates drastically different from the destination home will all require additional patience. There is no universal countdown clock because acclimation happens based on the unique relationship between the delivered material and the specific room where it will live.
Rushing this timeline to meet a contractor deadline or a personal schedule is one of the most expensive shortcuts a homeowner can take. Every species and every cut responds at its own pace, and no amount of fan circulation or thermostat manipulation can safely compress the process without introducing risk. The only reliable method is to monitor readings with a calibrated meter, checking daily until the numbers hold steady across multiple consecutive measurements.
Essential steps for properly acclimating your planks
Preparing the room before installation
Before your delivery arrives, the room itself must be ready. All wet trades, including painting, plastering, drywall taping, and concrete pouring, should be fully complete and thoroughly dried. The HVAC system needs to be operational and running at the same settings the household will maintain year-round, because the goal is to expose the material to realistic living conditions rather than construction-phase extremes. If you are working on a new build, coordinate with your general contractor so the job site has reached a finished interior state before any bundles are brought inside.
Subfloor preparation is equally important. Concrete slabs should be tested for residual vapor using calcium chloride or relative humidity probe tests, and readings must fall within the ranges specified by the manufacturer. Plywood and OSB subflooring should be dry, level within tolerance, and free of debris. A stable indoor environment combined with a properly prepared subfloor creates the foundation for a smooth acclimation period and a successful long-term installation.
Measuring relative humidity inside
A digital hygrometer placed at floor level in the center of the room gives you the most accurate snapshot of the conditions your material will face. We recommend keeping indoor relative humidity between 35 and 55 percent year-round, which aligns with the comfort range for most households and falls within the specifications published by nearly every major manufacturer. Readings outside this window signal a need for humidifiers, dehumidifiers, or HVAC corrections before the resting period begins.
Take measurements at different times of day and on different days of the week to capture fluctuations caused by cooking, bathing, laundry, and weather changes. A single snapshot can be misleading because indoor vapor levels swing throughout a normal 24-hour cycle. Recording a log over several days before your delivery arrives gives you a realistic baseline and helps you identify any corrections that need to happen before the bundles are stacked in the room.
The differences between solid and engineered wood flooring
Solid wood requirements
Traditional milled lumber cut from a single piece of timber is the most sensitive to atmospheric changes because every fiber runs in the same direction, allowing the entire cross-section to expand and contract uniformly. You must acclimate solid material with extra care, giving it a longer resting window than layered alternatives and monitoring readings more frequently. Species like red and white varieties harvested domestically tend to respond faster than exotic imports, but all single-piece products demand respect during this phase.
Thickness plays a significant role as well. A three-quarter-inch profile holds substantially more cellular material than a thinner option, meaning vapor must travel farther to reach the center of the board. Wider widths amplify dimensional movement, so a five-inch-wide profile will show more seasonal change than a narrower strip. Accounting for these variables during the resting period prevents surprises once the material is locked into place.
Engineered options
Layered construction uses a thin veneer of real wood bonded to a core made from plywood, HDF, or another composite substrate. Because the layers are stacked with alternating grain directions, engineered hardwood resists dimensional movement far more effectively than its single-piece counterpart. This cross-laminated design means each layer counteracts the expansion tendencies of the one above and below it, resulting in a product that is inherently more dimensionally consistent.
Despite this structural advantage, layered products still require a transition window. The real-wood veneer on the surface still exchanges vapor with the atmosphere, and the adhesive bonds can be stressed if the core and the veneer respond at different rates. Manufacturers still specify resting periods for layered products, and cutting corners here can void your warranty and lead to delamination or surface checking over time.
Factory finished variations
Products that arrive with a UV-cured urethane or aluminum oxide coating applied at the manufacturing facility have a slight advantage because the factory finish seals the top surface and reduces the rate of vapor exchange through the wear layer. However, the bottom and edges of each piece of the hardwood flooring remain exposed, so atmospheric interaction still occurs through those unprotected surfaces. The coating slows the process but does not eliminate the need for a resting period.
Factory-finished goods also benefit from tighter quality control during the curing process, meaning their internal readings at the time of packaging tend to be more consistent from bundle to bundle. This uniformity can shorten the resting window slightly, but only when verified by on-site meter readings. Never assume that a sealed surface means the product is ready to install straight off the delivery truck.
Unfinished products
Raw, uncoated material that will be sanded and finished on-site after installation is the most exposed category because every surface is open to the atmosphere. This makes the transition period both faster and more volatile, as the material will gain or lose internal water more rapidly than a coated alternative. Installers who work with unfinished goods often acclimate wood floor products for a longer window to account for this accelerated exchange rate and to ensure the readings are truly settled before sanding begins.
Sanding and finishing add their own complications because water-based and oil-based coatings introduce additional liquid into the surface layer, which the material then has to process. Scheduling the sanding phase only after the resting period is complete and readings have stabilized prevents the coating from trapping excess vapor beneath the surface, which can cause adhesion failure and a cloudy or peeling finish down the road.
Common mistakes during floor acclimation
Storing materials in the garage instead of the home

One of the most frequent errors homeowners and inexperienced contractors make is leaving bundled material in a garage, carport, or covered porch instead of bringing it directly into the room where it will be installed. Garages are not climate-controlled environments, and their temperature and humidity swings can be dramatic, especially in regions with hot summers or cold winters. Storing bundles there does nothing to prepare the material for your interior conditions and may actually move the internal readings further from your target number.
Another common misstep during the floor acclimation process is failing to break open the packaging. Shrink wrap and sealed cardboard prevent airflow around all surfaces of the material, drastically slowing the vapor exchange that drives the entire process. Bundles should be opened and loosely cross-stacked with spacers between each layer so air circulates freely on every side of the planks. Properly acclimating your material means exposing every surface to room air, so leaving bundles sealed in their shipping packaging inside the correct room still delays the timeline significantly.
Signs of a failing hardwood floor due to improper preparation
Cupping and crowning
Cupping occurs when the edges of each board rise higher than the center, creating a concave profile across the face. This defect signals that the bottom of the hardwood floor is absorbing more vapor than the top, often because of excessive subfloor humidity or a missing vapor barrier. The uneven expansion across the thickness of the board forces the edges upward, and in severe cases, the boards can lift enough to create a tripping hazard or crack under foot traffic.
Crowning is the opposite condition, where the center of each board pushes higher than the edges, forming a convex shape. This typically happens after a cupped wood floor is sanded flat before the underlying cause of the imbalance has been resolved. Once the excess subsurface vapor dissipates, the previously swollen edges shrink below the sanded center line, leaving the crown visible. Both defects are direct consequences of installing material that had not reached its resting point or failing to control the subfloor environment.
Gapping between boards
Seasonal gaps that open during dry winter months and close again in humid summer months are a normal characteristic of natural timber installations. However, gaps that remain open year-round or that are wide enough to collect debris indicate that proper acclimation was not achieved before the material was fastened down. The boards were installed while carrying more internal water than the home environment could sustain, and as the excess departed, the material shrank permanently beyond the expansion gap that the installer had planned for.
Persistent gapping is more than a cosmetic issue. Open seams allow dirt, liquid spills, and pet hair to reach the subfloor, creating conditions that promote mold growth and structural damage over time. Repairing wide gaps after the fact typically requires pulling up sections and re-milling filler strips, which is an expensive and time-consuming correction that could have been avoided entirely with an adequate resting window before installation day.
Tools needed for successful flooring acclimation
A pin-style or pinless moisture meter is the single most important instrument for managing this process. Pin meters drive two small probes into the surface and measure electrical resistance between them, giving a direct reading of the internal water percentage at the depth the pins reach. Pinless meters use electromagnetic signals to scan below the surface without leaving marks, making them ideal for pre-finished goods where pin holes would damage the coating. Many professionals carry both types to cross-reference readings and catch inconsistencies. Successful flooring acclimation depends entirely on accurate, repeated measurements taken with a reliable instrument.
Beyond the meter, you will need a quality digital hygrometer for monitoring room conditions, a reliable thermometer for tracking temperature, and a notebook or smartphone app for logging daily readings in an organized format. Spacer sticks for cross-stacking bundles are inexpensive and essential for airflow, and a concrete humidity test kit is necessary if you are installing over a slab. Investing in these tools before your delivery arrives puts you in full control of the timeline and removes guesswork from every decision you make during the preparation phase.
Frequently asked questions about hardwood floors
Homeowners shopping for new hardwood floors frequently ask whether certain species require longer preparation times than others. The answer is yes. Dense tropical imports like Brazilian cherry and ipe respond more slowly than domestic species such as oak or maple because their tighter grain structure restricts the rate of vapor movement through the fibers. Always check the manufacturer data sheet for species-specific guidance, and when in doubt, extend the window rather than shorten it.
Another common question involves whether radiant heat systems change the process. They absolutely do. Radiant systems warm the subfloor directly, which lowers the relative humidity at the surface of the material and accelerates the drying effect. The heating system must be operational and running at normal output levels during the entire resting window so the material can reach its target reading under the actual conditions it will experience year-round. Turning the system off during the preparation phase and then activating it after installation creates a sudden environmental shift that can trigger rapid shrinkage and widespread gapping.
Final thoughts on protecting your investment
Solid wood is a premium building material that rewards patience and punishes shortcuts. The weeks you spend allowing your material to adjust to your home's environment represents a small fraction of the decades of beauty and durability a well-installed floor will deliver. Every dollar you spend on quality material is wasted if the preparation phase is ignored, compressed, or handled carelessly. Treat the resting period as a non-negotiable line item on your project timeline, not a suggestion that can be trimmed when schedules get tight.
Maintaining consistent indoor conditions after installation is just as important as the preparation that came before it. Dramatic seasonal swings in temperature and humidity will continue to affect your investment for as long as it remains in your home. Running your HVAC system year-round, using humidifiers during dry winter months, and addressing any plumbing leaks or drainage issues immediately will keep your material performing at its best for generations. The effort you invest in understanding and respecting the nature of real timber pays dividends every single day you walk across your finished room.